Lens Cleaning Tips: How to Keep Your Camera Gear Dust-Free
A clean lens is essential for sharp, high-quality images. Even a small speck of dust or a smudge on your camera lens can reduce image clarity, create unwanted flares, and impact color accuracy. For photographers and videographers, maintaining clean camera gear is just as important as knowing how to compose a great shot.
In this comprehensive guide, we’ll cover the best lens cleaning techniques, tools, and preventative measures to keep your DSLR, mirrorless, or cinema camera lenses dust-free and performing at their best.
Why Lens Cleaning Matters
Camera lenses are precision optical instruments. Dust, fingerprints, oil, or smudges can negatively affect image quality, especially when shooting at wide apertures or with long focal lengths.
Common Problems Caused by Dirty Lenses:
- Reduced sharpness – Dust on the front element can scatter light.
- Lens flares – Smudges or fingerprints can create unwanted reflections.
- Color distortion – Oil or grime may slightly alter colors in photos.
- Autofocus issues – Dirt near electronic contacts can interfere with camera-lens communication.
Maintaining a clean lens ensures optimal performance and protects your investment in expensive camera gear.
Essential Tools for Lens Cleaning
Before cleaning your lens, make sure you have the right tools. Using the wrong materials can scratch or damage lens coatings.
Recommended Lens Cleaning Tools:
- Lens blower – Removes loose dust particles without touching the glass.
- Lens brush – Soft-bristled brush for gently sweeping away dirt.
- Microfiber cloth – Non-abrasive cloth for wiping smudges and fingerprints.
- Lens cleaning solution – Alcohol-based solution or specialized lens cleaner.
- Lens cleaning tissues – Disposable wipes safe for optical coatings.
Avoid using household tissues, paper towels, or clothing, as they can scratch the lens coating.
Step-by-Step Lens Cleaning Techniques
Here’s how to clean your lens safely and effectively.
1. Remove Loose Dust with a Blower
- Hold the lens upside down.
- Use a lens blower to remove dust and debris.
- Avoid using compressed air cans; they may spray propellant onto the lens.
This step reduces the risk of scratching the glass during wiping.
2. Gently Brush Remaining Dust
- Use a lens brush to sweep away any remaining dust.
- Work from the center outward in a circular motion.
- Ensure the brush is clean and soft to prevent scratches.
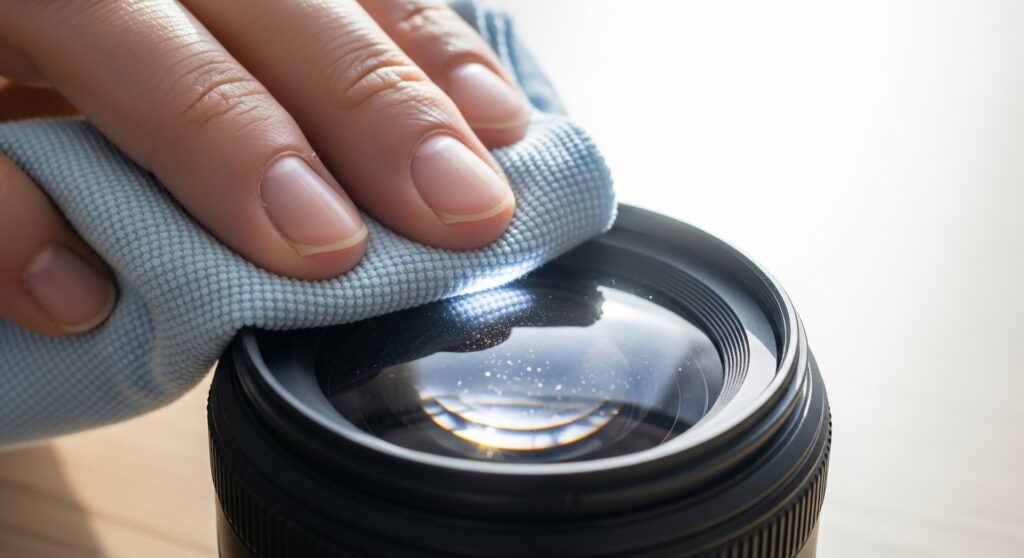
3. Wipe Smudges with a Microfiber Cloth
- Apply a small amount of lens cleaning solution to the cloth, not directly on the lens.
- Wipe the lens gently in circular motions, starting from the center and moving outward.
- Avoid excessive pressure to prevent damaging coatings.
4. Clean Lens Filters Separately
- If your lens has a UV or polarizing filter, remove it and clean it using the same steps.
- Filters often accumulate fingerprints and dust faster than the lens itself.
5. Clean Lens Mounts and Rear Elements
- Occasionally check the rear lens element and electronic contacts.
- Use a blower and microfiber cloth to remove dust from these areas.
- Clean electronic contacts carefully to avoid camera malfunctions.
Preventing Dust on Lenses
Cleaning is easier when you minimize dust accumulation in the first place.
1. Use Lens Caps
Always use front and rear lens caps when your lens is not in use.
2. Store in a Camera Bag or Case
Keep lenses in padded compartments to prevent dust exposure.
3. Avoid Changing Lenses in Dusty Areas
Changing lenses outdoors or in dusty environments increases the risk of debris entering the camera body.
4. Use UV or Protective Filters
A UV filter acts as a barrier, protecting the lens from dust, dirt, and scratches.
5. Regular Maintenance
- Clean lenses every few weeks if used frequently.
- Inspect for dust, fingerprints, and smudges before important shoots.
Tips for Cleaning Different Lens Types
Prime Lenses
- Prime lenses have fewer moving elements and are easier to clean.
- Focus on front and rear elements and lens mount contacts.
Zoom Lenses
- Zoom lenses have more moving parts, so avoid excessive pressure when cleaning.
- Extend the zoom to clean both ends of the lens carefully.
Large Aperture Lenses
- Wide-aperture lenses (f/1.2, f/1.4) are more sensitive to smudges.
- Pay extra attention to front element cleaning to preserve sharpness.
What to Avoid When Cleaning Lenses
To prevent accidental damage, avoid the following:
- Using paper towels or tissues (can scratch coatings)
- Spraying cleaning solution directly on the lens
- Excessive rubbing with force
- Household cleaning products
- Compressed air cans with high pressure
Cleaning Camera Sensor
While this guide focuses on lenses, it’s also essential to keep your camera sensor clean. Dust on the sensor can create dark spots in images. Many modern cameras have sensor cleaning modes or allow professional cleaning.
Professional Lens Cleaning
For expensive or delicate lenses, professional cleaning is sometimes the safest option.
- High-end lenses with special coatings
- Vintage or rare lenses
- Internal dust inside lens elements
Professional technicians have specialized equipment to clean internal elements without risk.
Final Thoughts
Keeping your camera lenses dust-free is essential for capturing sharp, high-quality images. Regular cleaning and preventive care not only maintain image clarity but also prolong the life of your gear.
Key takeaways:
- Use proper lens cleaning tools like blowers, microfiber cloths, and lens solution.
- Remove dust first before wiping smudges.
- Avoid common mistakes that can scratch lens coatings.
- Store lenses safely and use protective filters.
- Consider professional cleaning for delicate or internal lens elements.
With the right habits and tools, your lenses will remain in excellent condition, ensuring every photo and video you capture is crisp, clear, and professional.