How to Change Aperture on Canon Rebel T7?
The Canon Rebel T7, also known as the EOS 2000D or Kiss X90 in different markets, is a popular entry-level DSLR camera that offers a great balance of features for beginners and enthusiasts alike. One of the most crucial aspects of photography is understanding and controlling aperture. Aperture not only affects the amount of light entering your camera but also plays a significant role in determining the depth of field in your images.
This article will walk you through the process of changing aperture on your Canon Rebel T7, explain the impact of aperture on your photos, and provide you with practical tips to enhance your photography skills.
How Aperture Works on DSLRs
Aperture refers to the opening in your camera’s lens through which light passes to reach the sensor. It’s measured in f-stops, with smaller f-numbers representing larger apertures and vice versa. For example, f/2.8 is a larger aperture than f/16.
The aperture serves two primary functions:
- Controlling the amount of light entering the camera: A larger aperture (smaller f-number) allows more light in, while a smaller aperture (larger f-number) restricts light.
- Affecting depth of field: A larger aperture creates a shallow depth of field, blurring the background and foreground, while a smaller aperture increases the depth of field, keeping more of the scene in focus.
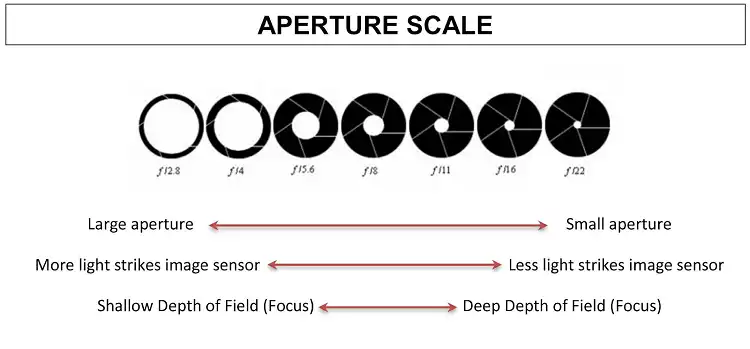
Image: Aperture sizes f-stop diagram
Canon Rebel T7 Shooting Modes & Their Aperture Control
The Canon Rebel T7 offers several shooting modes, but not all of them allow direct control over aperture. Here are the main modes you’ll be working with:
- Aperture Priority (Av) Mode: This semi-automatic mode lets you set the aperture while the camera adjusts the shutter speed for proper exposure.
- Manual (M) Mode: In this mode, you have full control over both aperture and shutter speed.
- Program (P) Mode: While you can’t directly control aperture in this mode, you can use Program Shift to indirectly influence aperture settings.
- Auto Mode and Scene Modes: These modes don’t allow manual aperture control.
Changing Aperture in Aperture Priority (Av) Mode
Aperture Priority mode is ideal for beginners who want to experiment with aperture control. Here’s how to use it:
- Turn the mode dial on top of your camera to ‘Av’.
- Look through the viewfinder or at the LCD screen.
- Use the main dial (located near the shutter button) to adjust the aperture.
- As you turn the dial, you’ll see the f-number changing in the viewfinder or on the LCD screen.
Remember, in Av mode, as you change the aperture, the camera will automatically adjust the shutter speed to maintain proper exposure.
Adjusting Aperture in Manual (M) Mode
For more advanced control, you can use Manual mode:
- Turn the mode dial to ‘M’.
- Use the main dial to adjust the aperture.
- Use the Quick Control Dial (the large dial on the back of the camera) to adjust the shutter speed.
- Keep an eye on the exposure level indicator in the viewfinder or on the LCD screen to ensure proper exposure.
In Manual mode, you’ll need to balance aperture, shutter speed, and ISO to achieve the correct exposure.
What Affecting Aperture Range
The aperture range available to you depends on the lens you’re using. The Canon Rebel T7 typically comes with an 18-55mm kit lens, which has a variable maximum aperture:
- At 18mm zoom: Maximum aperture of f/3.5
- At 55mm zoom: Maximum aperture of f/5.6
The minimum aperture (largest f-number) is usually f/22 or f/32, depending on the specific lens.
Tips for Choosing the Right Aperture
Selecting the appropriate aperture depends on your subject and the effect you want to achieve:
For portraits: Use a large aperture (small f-number) like f/1.8 to f/4. This creates a shallow depth of field, blurring the background and making your subject stand out.
For landscapes: Opt for a smaller aperture (larger f-number) such as f/8 to f/16. This increases depth of field, keeping more of the scene in focus from foreground to background.
For low-light situations: Use a larger aperture to allow more light into the camera, helping you maintain a faster shutter speed and lower ISO.
Remember to consider the exposure triangle – the relationship between aperture, shutter speed, and ISO. Changing one will affect the others, so you may need to adjust accordingly to maintain proper exposure.
Previewing and Reviewing Aperture Changes
After changing the aperture, it’s crucial to preview and review your settings:
- Use the depth-of-field preview button (if available on your model) to see how the aperture affects your image in real-time.
- Take a test shot and review it on the LCD screen.
- Check the histogram to ensure proper exposure.
- Zoom in on the image to check focus and sharpness.
Wrapping Up
Mastering aperture control on your Canon Rebel T7 opens up a world of creative possibilities in your photography. Remember, practice is key. Experiment with different apertures in various lighting conditions and for different subjects. As you gain experience, you’ll develop an intuitive understanding of how to use aperture to achieve your desired results.
Key takeaways:
- Larger apertures (smaller f-numbers) create shallow depth of field and let in more light.
- Smaller apertures (larger f-numbers) increase depth of field and restrict light.
- Use Av mode for easy aperture control, or M mode for full manual control.
- Consider the exposure triangle when adjusting aperture.
- Practice and experimentation are crucial for mastering aperture control.
With these skills and knowledge, you’re well on your way to creating stunning images with your Canon Rebel T7. Happy shooting!