How Often Do You Use GND Filters?
Graduated Neutral Density (GND) filters have long been a staple tool for landscape photographers, allowing them to balance exposure between bright skies and darker foregrounds in a single shot.
However, with advancements in digital post-processing techniques, many photographers now question whether these physical filters are still necessary.
The debate between using GND filters in the field versus relying on post-processing methods like exposure blending or HDR has become a hot topic in the photography community.
This article explores the pros and cons of GND filters, when to use them, and how they compare to modern post-processing techniques.
By understanding both approaches, photographers can make informed decisions about which method best suits their shooting style and the specific scenes they encounter.
What are Graduated Neutral Density (GND) Filters?
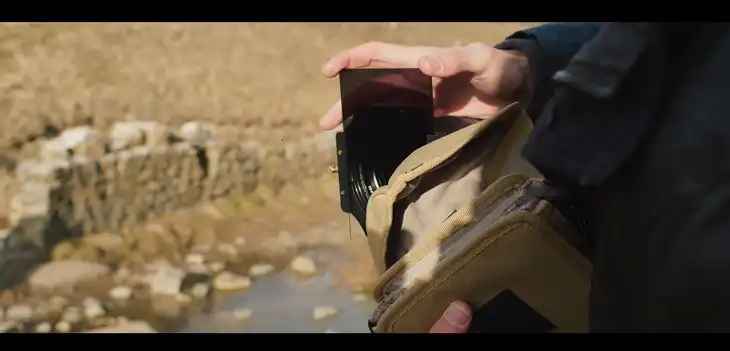
Graduated Neutral Density filters, commonly known as GND filters, are essential tools in a landscape photographer’s kit. These rectangular pieces of glass or resin are designed to selectively reduce the amount of light entering the camera lens.
What sets them apart from standard neutral density filters is their graduated design – one half of the filter is clear, while the other half is tinted, with a gradual transition between the two.
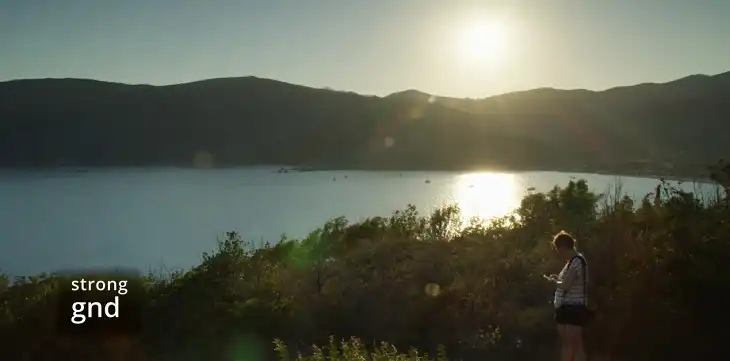
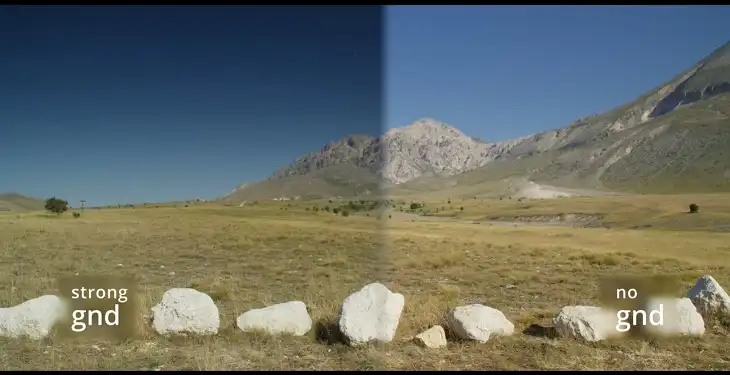
The primary purpose of GND filters is to balance the exposure in high-contrast scenes, particularly those with bright skies and darker foregrounds.
By placing the tinted portion of the filter over the brighter part of the scene (typically the sky), photographers can capture a more balanced exposure in a single shot.
GND Filters Come In Two Main Types:
- Soft-edge GND filters: These feature a gradual transition from dark to clear, making them ideal for scenes without a defined horizon line, such as mountainous landscapes or cityscapes.
- Hard-edge GND filters: These have a more abrupt transition, suitable for scenes with a clear, straight horizon line, like seascapes.
The strength of GND filters is measured in stops, typically ranging from 1 to 4 stops. This indicates how much light the tinted portion of the filter blocks compared to the clear section.
When to Use GND Filters
GND filters shine in situations where the dynamic range of a scene exceeds what your camera can capture in a single exposure. Here are some scenarios where GND filters prove particularly useful:
Sunrise And Sunset Landscapes:
These golden hour shots often feature bright skies and darker foregrounds, making them perfect candidates for GND filter use.
Seascapes:
The stark contrast between a bright sky and a darker ocean can be easily balanced with a hard-edge GND filter.
Mountain Landscapes:
Soft-edge GND filters can help tame bright skies while maintaining detail in shadowy valleys and forests.
Architectural Photography:
When shooting buildings against a bright sky, GND filters can help retain detail in both the structure and the sky.
Using a GND filter in these situations allows you to capture a well-exposed image in-camera, potentially reducing the need for extensive post-processing work.
When Not to Use GND Filters
While GND filters are versatile tools, they’re not suitable for every situation. Here are some scenarios where you might want to avoid using them:
Uneven horizons:
If your scene features an irregular horizon line, such as a cityscape with varying building heights, a GND filter might create unnatural darkening on parts of your subject.
Rapidly changing light conditions:
In situations where the light is changing quickly, constantly adjusting your filter can be impractical and may cause you to miss crucial shots.
Scenes with bright foreground elements:
If your foreground contains bright elements that extend into the sky (like tall trees or buildings), a GND filter might darken these unnaturally.
When you prefer more post-processing control:
Some photographers prefer the flexibility of capturing multiple exposures and blending them in post-processing for more precise control.
GND Filters vs Post-Processing Techniques
The debate between using GND filters and relying on post-processing techniques like exposure blending or HDR is ongoing in the photography community. Both approaches have their merits and drawbacks:
Pros of GND Filters:
- Allow for capturing a balanced exposure in a single shot
- Reduce time spent in post-processing
- Enable you to see the final result in-camera
- Can be useful in situations where bracketing isn’t possible (e.g., moving subjects)
Cons of GND Filters:
- Can be challenging to position accurately, especially in uneven landscapes
- Additional gear to carry and manage in the field
- Limited flexibility once the shot is taken
- Potential for visible transition lines in certain scenes
Pros of Post-Processing Techniques:
- Offer more flexibility and precise control over the final image
- Allow for adjustments to be made after the fact
- No need for additional physical filters
- Can handle complex scenes with irregular horizons more easily
Cons of Post-Processing Techniques:
- Require more time in front of the computer
- May result in less natural-looking images if not done carefully
- Require multiple exposures, which isn’t always possible in all situations
Tips for Using GND Filters
If you decide to incorporate GND filters into your workflow, here are some tips to help you get the most out of them:
- Choose the right strength: Start by assessing the difference in brightness between the sky and foreground. A good rule of thumb is to use a filter that reduces the sky to within one stop of the foreground’s brightness.
- Position carefully: Align the transition of the filter with the horizon or the area where the brightness changes in your scene. Take your time to get this right, as it’s crucial for a natural-looking result.
- Stack filters if needed: In extreme contrast situations, you can stack multiple GND filters or combine them with solid ND filters for even more control.
- Use a filter holder system: This allows for easier adjustment and precise positioning of your filters.
- Experiment with different types: Try both soft and hard-edge filters to see which works best for your typical shooting scenarios.
Alternatives to GND Filters
If you prefer not to use physical GND filters, there are several alternative techniques you can employ:
- Exposure bracketing: Take multiple shots at different exposures and blend them in post-processing. This technique works well for static scenes and gives you more control over the final image.
- HDR (High Dynamic Range) photography: Similar to bracketing, but typically involves merging multiple exposures into a single HDR image, which is then tone-mapped for a final result.
- Luminosity masking: This advanced post-processing technique allows for precise blending of multiple exposures based on the brightness levels in the image.
- Graduated filters in post-processing: Many editing software packages offer digital graduated filters that can be applied and adjusted after the fact.
These techniques can be powerful alternatives to physical filters, especially in situations where GND filters might struggle, such as scenes with irregular horizons or complex lighting.
Conclusion
The decision to use GND filters or rely on post-processing techniques ultimately comes down to personal preference and the specific requirements of your shooting situations.
GND filters offer the advantage of capturing balanced exposures in-camera, potentially saving time in post-processing and allowing for a more traditional approach to landscape photography.
On the other hand, post-processing techniques provide greater flexibility and can handle more complex scenes, albeit at the cost of additional time spent editing.
Many photographers find that a combination of both approaches works best. Using GND filters in the field when appropriate, while also capturing bracketed exposures as a backup, provides the best of both worlds.
This hybrid approach allows for maximum flexibility and ensures you have options when it comes time to process your images.
Frequently Asked Questions
1. How Often Do You Use GND Filters?
The frequency of using Graduated Neutral Density (GND) filters depends on the type of photography you do.
Landscape photographers often use GND filters whenever they need to balance the exposure between a bright sky and a darker foreground.
If you frequently shoot outdoor scenes with high contrast, you might find yourself using a GND filter regularly.
2. When to Use a GND Filter?
You should use a GND filter when you’re photographing scenes with a significant difference in brightness between the sky and the foreground, such as during sunrise or sunset.
This filter helps to reduce the brightness of the sky while keeping the foreground properly exposed, preventing overexposure and preserving details in both areas.
3. What Is the Most Commonly Used GND Filter?
The most commonly used GND filter is the GND8, which offers a 3-stop reduction in light. This filter is popular because it provides a good balance for many lighting situations, especially when the sky is bright but not overwhelmingly so. It’s a versatile choice for a wide range of landscape photography conditions.
4. What Is a GND Lens Filter?
A GND lens filter, or Graduated Neutral Density filter, is a piece of glass or resin with a gradient that transitions from dark to clear. The darkened portion reduces the amount of light reaching the sensor in specific areas of the image, typically the sky, while the clear part allows light to pass through normally, balancing the exposure.
5. What Is a Graduated Neutral Density Filter Used For?
A Graduated Neutral Density filter is used to bring an overly-bright part of a scene, like the sky, into the dynamic range of your film or camera sensor. By darkening the bright areas, it allows you to capture more detail in both the highlights and shadows of a scene, creating a more balanced and visually pleasing image.
6. What Is the Best ND Filter for Sunsets?
The best ND filter for sunsets is typically a 6-stop Neutral Density filter. This filter allows you to extend your exposure time, creating smooth, silky skies and water while maintaining rich colors and details in the scene. It’s ideal for capturing the vibrant hues and dynamic range often present during sunset.
7. Should I Use a Graduated ND Filter?
Yes, using a graduated ND filter can significantly improve your landscape photography by helping you retain incredible depth and detail in both the shadows and highlights.
This filter is particularly useful when dealing with scenes that have a wide dynamic range, allowing you to capture a more balanced and detailed image.